# Screen and Operations
# Screen Description
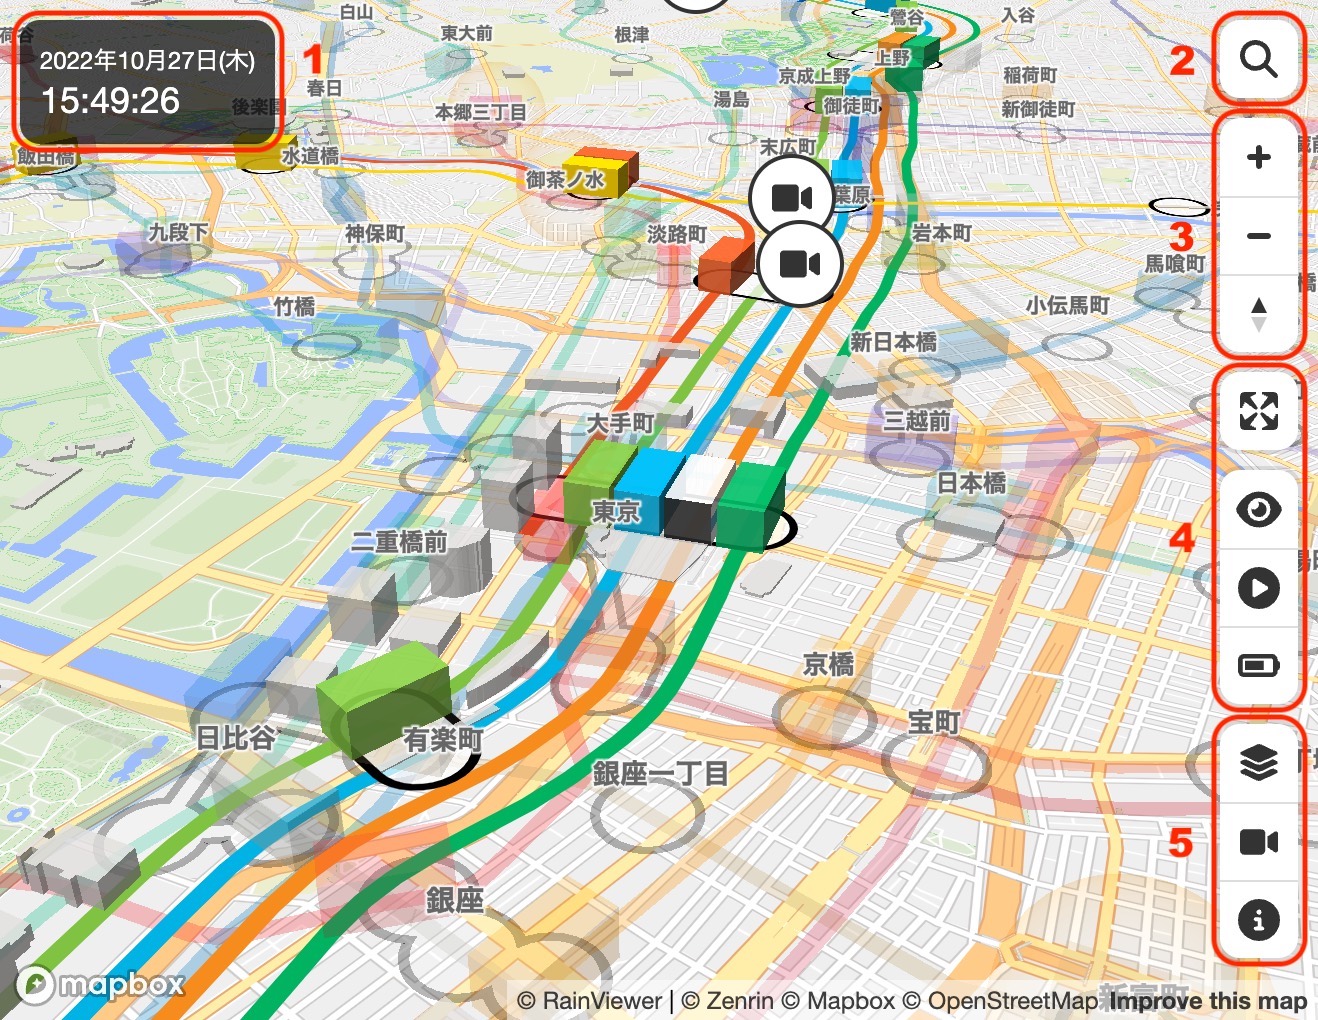
- Date and Time: See Date and Time
- Search Button: See Station Search
- Navigation Buttons: See Zooming-In/Out and Rotation and Tilting
- Display Mode Switching Buttons: See Display Modes
- Configuration Buttons: See Configuration
# Panning
You can move your location by panning the map with a mouse or finger drag. You can also pan the map with the arrow keys on your keyboard.
# Zooming-In/Out
![]()
Click or tap the “+” or “−” icon button to zoom in or out the map. You can also zoom in or out by rotating the mouse wheel or pinching in or out of the screen.
You can zoom in or out the map by pressing the “=” or “−” key on the keyboard. You can also zoom in the map by double-clicking with the mouse or triple-tapping, or zoom out by double-clicking while holding down the Shift key on the keyboard or two-finger tapping.
A box zoom can be used by dragging the mouse while holding down the Shift key on the keyboard and selecting a rectangle on the screen.
# Rotation and Tilting
![]()
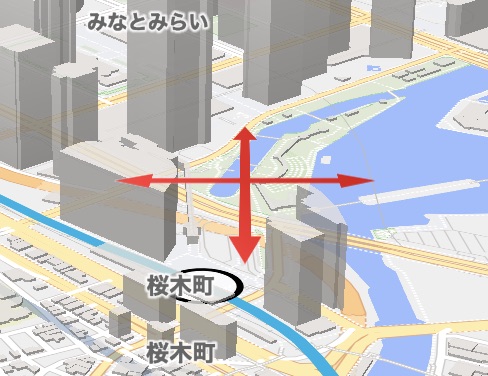
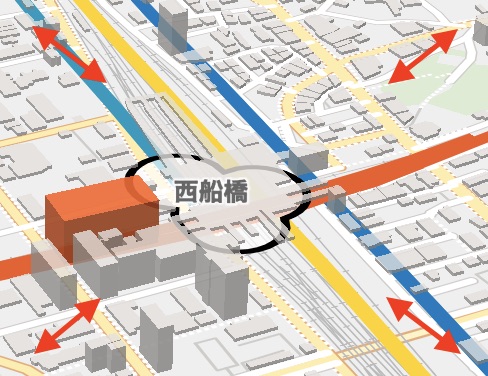
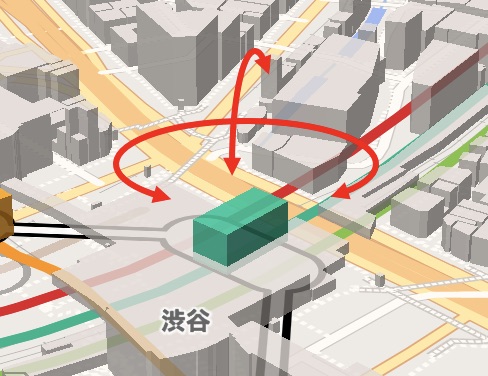
The compass icon represents the orientation of the map. If you press the compass icon button and drag the mouse or your finger to the left or right, you can rotate the map. You can also change the rotation and tilt of the map by dragging with the right mouse button, or by dragging with the left mouse button while holding down the Ctrl key on the keyboard. You can drag two fingers up and down to change the tilt of the map.
You can also change the rotation and tilt of the map by holding down the Shift key on your keyboard and pressing the arrow keys. You can also rotate the map by pinching the screen.
Click or tap the compass icon button and the bearing will be reset to true north.
# Date and Time
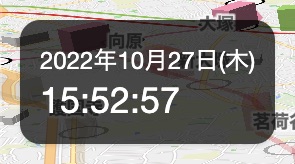
The current date and time is displayed at the top left of the screen. It is convenient when accessing from overseas because Japan standard time is always displayed. When Playback Mode is on, additional buttons appear below the current time to change the time and the speed at which the time progresses.
See here for details on Playback Mode.
# Displaying Detailed Information on Trains and Airplanes
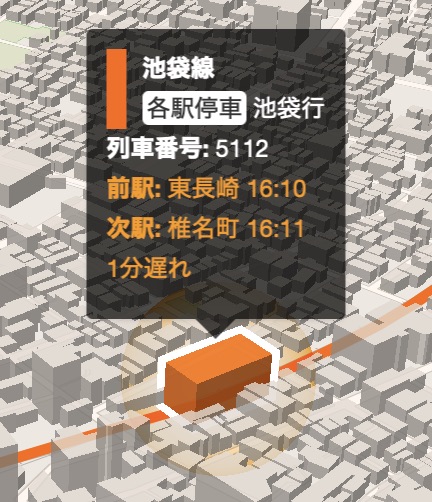
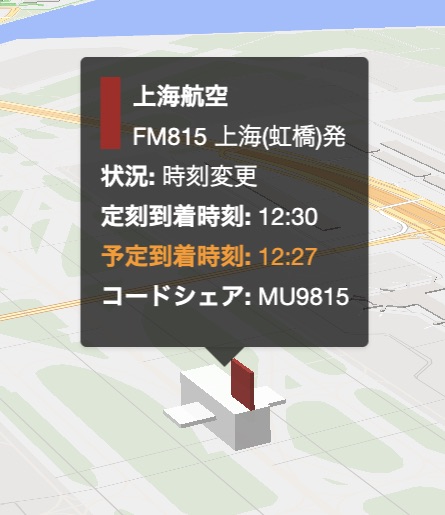
Place the mouse pointer or tap on the train or airplane to display detailed information about it. Detailed train information includes railway name, train type, destination, train number, previous or standing station and departure time, next station and arrival time, delay time, and operation information. Flight details include airline name, flight number, departure or arrival location, status, departure or arrival time, and code-share information. If there is a train delay or a flight schedule change, the change will be highlighted in orange.
# Displaying Detailed Information on Stations
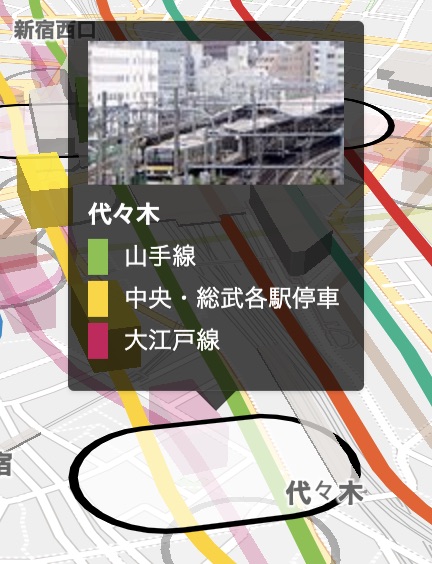
Place the mouse pointer or tap on the station to display detailed information about it. Detailed information includes station photo, station names, and connecting line names. If a station has different names for different lines but is a single transfer station, the information will be displayed together.
# Tracking Trains and Airplanes
Clicking or tapping on a train or airplane will turn on Tracking Mode and the screen will automatically move following the movement of the train or airplane. There are eight viewpoints in Tracking Mode: “Position only”, “Back”, “Top-back”, “Front”, “Top-front”, “Helicopter”, “Drone” and “Bird”, allowing you to enjoy the scenery along the railway from your preferred viewpoint. When the Tracking Mode is turned on, map panning, zooming in/out, rotation and tilting operations are disabled (zooming in/out, rotation and tilting are enabled only for the “Position only” viewpoint). Clicking or tapping on a map with no trains or airplanes turns Tracking Mode off.
When Tracking Mode is on, the timetable and current position of the train being tracked is displayed at the bottom of the screen. For the train connecting to other lines, the timetables of those lines are also shown. The timetable can be scrolled by using the mouse wheel, dragging the scroll bar, or dragging your finger. Click or tap on the “∨” icon in the upper right corner of the timetable to hide the timetable at the bottom of the screen, and click or tap on the “∧” icon to display it again.
Also, when Tracking Mode is on, some devices will display the share button to share the train or flight being tracked.
The viewpoint in Tracking Mode can be changed in the Tracking Mode Settings panel. See here for more details.
# Sharing Trains and Flights
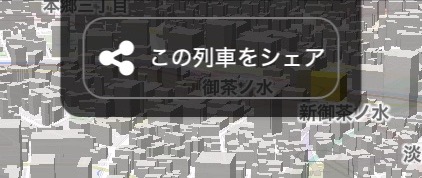
When Tracking Mode is on, the “Share this train” or “Share this flight” button will appear at the top of the screen. Clicking or tapping the button will bring up an additional menu, depending on the device you are using, and you can send the tracking URLs for the trains or flight and optional messages through messaging apps, email or social networking apps. When the recipient of the information opens the URL in their browser, Mini Tokyo 3D will be launched, and they will be able to track the same train or flight.
This feature is available in all browsers except Firefox.
# Delayed Train
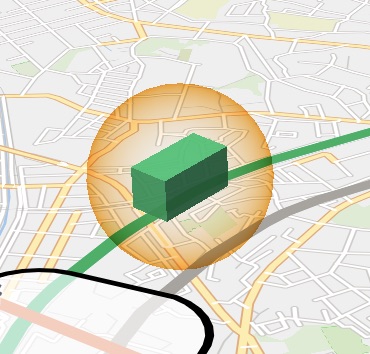
When Playback Mode is off, orange spheres are displayed around trains that are delayed for more than 1 minute. It is easy to see which sections on the map have the delay.
# Station Search
Click or tap the magnifying glass icon button to open the station name entry field. Enter the station name and press the Enter key, or click or tap the magnifying glass icon button to move to the station location on the map and have the station selected.
When you enter a part of the station name, a list of candidates will be displayed, and you can select one from the list to complete your input. In Japanese, Korean, and Chinese environments, you can also search by English name.
# Selecting Stations
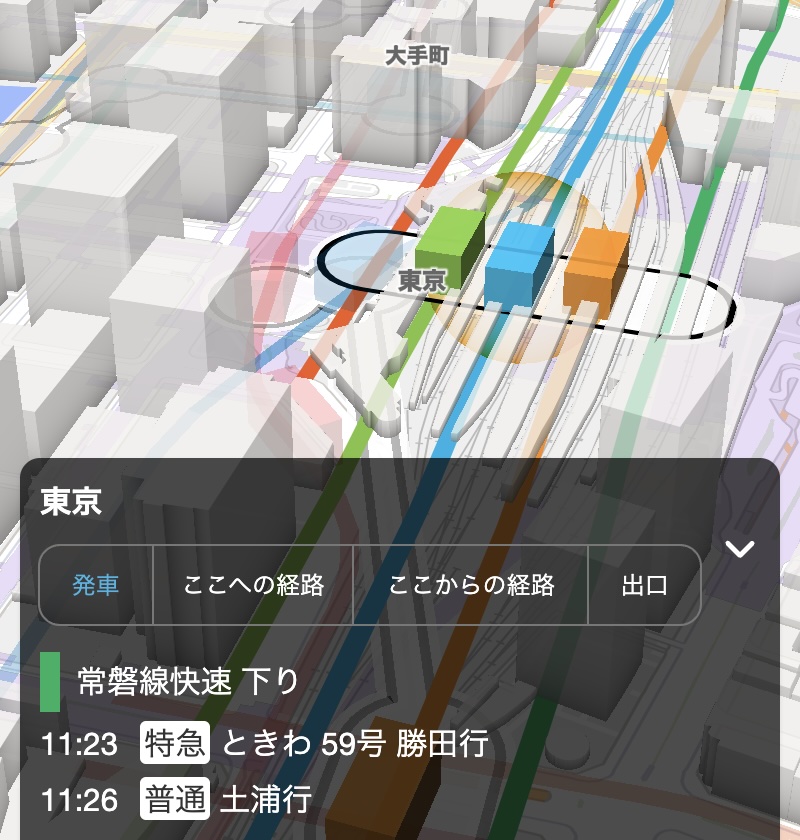
When you click or tap on a station, the station is selected, you will move on the map so that the station is centered on the screen, and the map around the station is enlarged. When a station is selected, the train departure board, route search, and station exit information are displayed at the bottom of the screen. You can switch the display of each information by clicking the toggle button below the station name. Click or tap on the “∨” icon to the right of the station name to hide the information at the bottom of the screen, and click or tap on the “∧” icon to display it again. Clicking or tapping on the map where no station exists will deselect the station.
# Displaying Train Departure Board
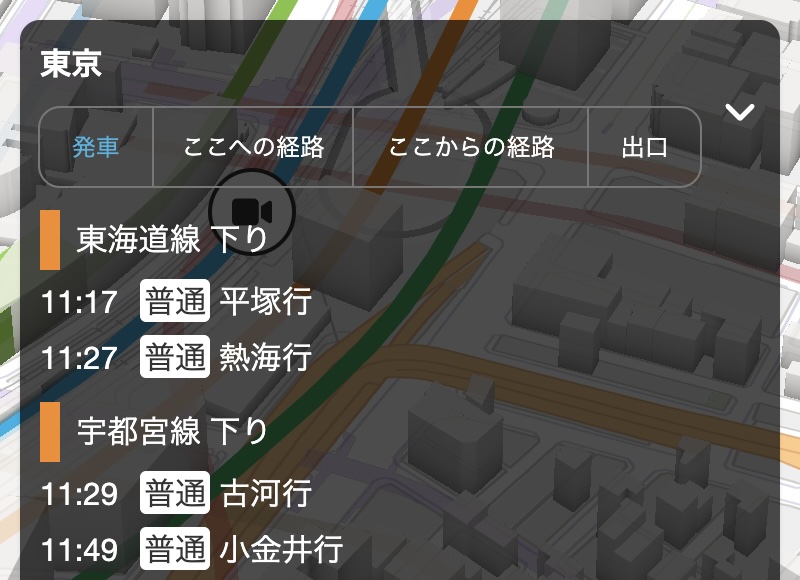
With a station selected, click or tap the “Departures” toggle button below the station name at the bottom of the screen to display the train departure board. The train departure board includes the departure time, train type, destination, and delay time of the first and next trains in each direction on the connecting lines of the station. If a train is delayed, the departure time and delay time are highlighted in orange.
# Route Search

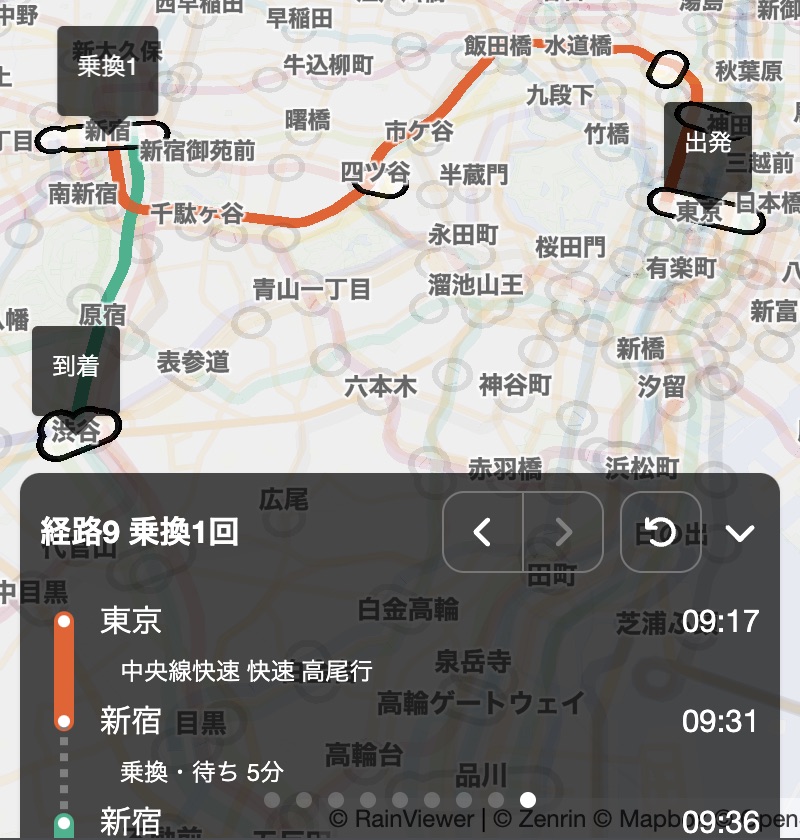
With a station selected, click or tap the “To here” or “From here” toggle button below the station name at the bottom of the screen to display the route search criteria entry panel. Enter the name of the departure station for “To here” or the name of the arrival station for “From here”, select the departure time, and click or tap the search button. Then, a recommended route will be highlighted on the map, and the search results panel will display information such as the trains to take, arrival and departure times, and transfer stations. Depending on the conditions, multiple route suggestions may be displayed, and you can switch between routes by pressing the “<” and “>” buttons at the top of the search results panel or swiping horizontally on the panel. You can also click or tap the “Back” icon button to return to the criteria entry panel.
When you enter a part of the station name, a list of candidates will be displayed, and you can select one from the list to complete your input. In Japanese, Korean, and Chinese environments, you can also search by English name. You can also enter the departure or arrival station by clicking or tapping on the stations on the map.
Trains, airplanes and layers will be temporarily hidden when the criteria entry panel or search result panel is displayed.
WARNING
As of the version 4.0 (beta 3), there are some limitations: you can only specify the time of departure, and you can only search for the train of the day.
# Displaying Station Exit Information
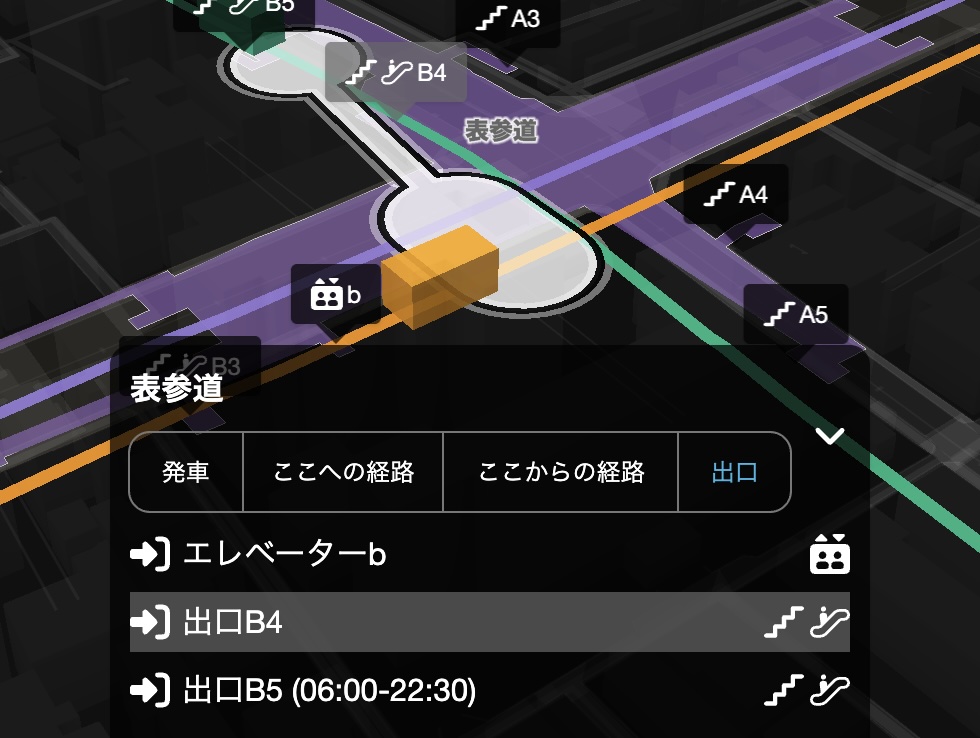
With a station selected, click or tap the “Exits” toggle button below the station name at the bottom of the screen to display a list of exits, as well as the location and name of the exit on the map. If you move the mouse pointer over the name of the exit in the list, the name of the exit will be highlighted on the map and you can check the location. Also, if you click or tap on the name of the exit in the list, a map of the area around the exit will be enlarged.
In addition to the names, the list of exits also shows the opening hours and icons of stairs or barrier-free facilities. Exits that are closed due to construction or other reasons, or exits that are closed after hours, are indicated in orange. The meaning of the barrier-free facility icons are as follows.
| Icon | Description |
|---|---|
| Stairs | |
| Wheelchair ramp | |
| Escalator | |
| Elevator |
WARNING
As of the version 4.0 (beta 3), only subway lines and underground stations are supported for displaying station exit information.